Image Analyzer examples
Help index
Changing Views
Changing your view of the images on the screen is accomplished quickly using just two tools on the toolbar and four function keys, F6 through F9. Alternately, you may use the options under Windows on the menu bar.
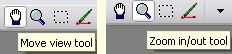
To get to the Zoom tool, click on the Magnifying Glass icon or press F8 once or twice. F8 toggles between the Zoom tool and the Select tool. When the Zoom tool is active, click the left mouse button to zoom in and the right mouse button to zoom out. The place on the image where you click the zoom tool will be the center of the zoomed image. This feature allows you to get a close view of any part of the image you want to inspect more closely.
No matter which tool is active, you may zoom in and out using the unshifted Plus and Minus keys.
If you zoom in so that the whole image no longer fits in the frame, you can move the image around in the frame with the Move tool, represented by the Hand icon on the toolbar. You can also move the image using the scroll bars that appear when the image is zoomed in. The cursor keys and the mouse wheel will also move the image within the frame. If the rectangular selection tool is active, you may around in the image by holding down the middle or the right mouse button.
Three other function keys work to change the view of your images. These options are also available under the Windows menu.
- F6: If there is just one image on the screen, F6 toggles the title bar and the frame around the image on and off. It also places the image upper left on the screen.
- F6: If there is more than one image on the screen, F6 tiles the images (with frames), and it toggles between horizontal and vertical tiles. It always places the active image in the upper left corner of the editing screen.
- F7: This key auto-sizes the image so that the whole image and frame will fit on the screen. If you want the active image to be in the upper left corner of the edit screen, press F6 before you press F7. If you only have one image on the screen, you may need to press F6 two times (to get a frame around it) before you press F7.
- F9: Press F9 for a fullscreen view. Fullscreen provides the most screen space for viewing your image, but it hides the toolbar and the Windows tray.
Double clicking on the title bar puts the image upper left with no title bar.
Selection Tools
Image Analyzer provides three selection tools to select limited parts of an image for special treatment. When a selection is active, filter effects and adjustments are applied only to the selected areas. Rectangular selections also allow you to crop to your selection (Alt-C), copy your selection (Ctrl-C), or to paste the Windows clipboard to your selection (Ctrl-E).

You get to the rectangular select tool by clicking on its toolbar icon or by pressing F8 once or twice. The icon shows a selection marquee, the dotted lines that appear around a selection. To make a selection, just hold down the left mouse button at the corner where you want to begin and drag the mouse (and cursor) to the diagonal corner. Release the button and your selection is completed. You may modify your selection by draging the sides or corners of the marquee while holding down the left mouse button. You may also move the selection within the image. When the cursor is inside the selection, it will appear as crossed arrows. Hold down the left mouse button and drag the selection in any direction.
A few other commands apply to rectangular selections.
- Ctrl(+) = Select All (if no selection is active)
- Right mouse click = Deselect
- Ctrl(+) = Expand selection by one pixel
- Ctrl(-) = Contract selection automatically
- Alt(C) = Crop image to selection
- Edit / Invert selection
- Edit / Lock selection H/W ratio : Discussed below under Cropping and Printing
- Feather icon on the toolbar = Set number of pixels to feather the edges when you apply your effect to the selection. The Feather icon is seen on the image just below as a fuzzy circle. It appears on the toolbar when you are using the rectangular selection tool.
- Ctrl(cursor left or right) = Moves the left side of the selection left or right.
- Ctrl(cursor up or down) = Moves the top side of the selection up or down.
- Alt(cursor left or right) = Moves the right side of the selection left or right.
- Alt(cursor up or down) = Moves the bottom side of the selection up or down.
- EDIT - Create selection from image
- EDIT - Selection from image (recall selection)

In addition to rectangular selections, there are three mask selection tools available from the tool bar. Two of them are discussed here. These are Paint selection and the Selection wand. The Paint selection tool is a brush, so you may set the size (in pixels) and shape (round or square). Hold down the left mouse button and drag the mouse to paint your selection freehand. Do the same with the right mouse button to remove portions of the selection. By going to the Edit menu you may invert a painted selection.

The selection wand automatically selects areas of similar color adjacent to the place where you left click the mouse. You can set the tolerance range for colors that the wand will select. The default is 20. If you set the tolerance to zero, nothing will be selected. If you set it to 255, the entire image will be selected. The tolerance is set by clicking on its icon on the woolbar as shown in the image above. This icon only appears on the toolbar when you use the selection wand. You may use the left mouse button to click on as many areas as you like to add areas to the selection. Use the right mouse button to subtract areas from it. The Invert selection option on the Edit menu is also available with selections created with the selection wand.
You may switch between these two selection tools (brush and wand) at will to add to or subtract from your selection.

Besides applying effects to selections and cropping to selections, we can also paste the contents of the clipboard into a rectangular selection. Click on the Paste to selection icon on the toolbar or press Ctrl(E) to accomplish this action. If no selection exists in your selection, pressing either icon or Ctrl(E) will create a selection in the upper left of your image of a size to match the size of the image in the clipboard. You may move this selection before pressing the icon or Ctrl(E) a second time, which will paste the image into the selection marquee. If you expand or contract the size of the selection marquee, the image in the clipboard will be stretched or shrunk to fit the marquee.
Ctrl-Plus = Increase selection by one pixel
Ctrl-Minus = Decrease selection by one pixel
EDIT - Create selection from image
EDIT - Selection from image (recall selection)
The third mask selection tool is discussed on a separate page: Smart select
An additional mask selection option is available under Edit on the menu bar. It is called Selection from color.
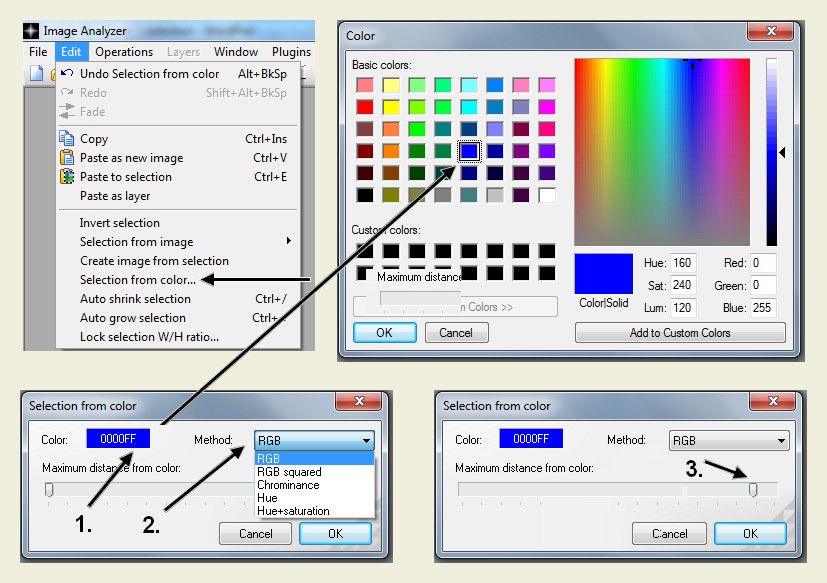
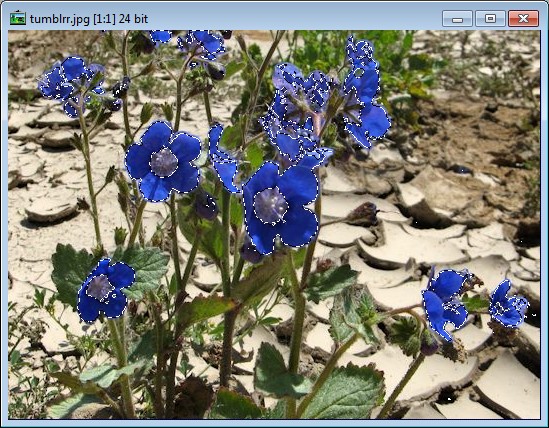
Clicking on Selection from color brings up the Selection from color dialog box. Click on the color patch to bring up the Color picker. Select your color and click OK. Now select from the five methods listed. The last step is to move the Maximum distance from color slider. You will see your selection grow as you move it to the right. Each of the five methods will require a different slider setting. Experiment to find the most effective method for your image. You can see the result on the image below.
Cropping and Printing
If you want to print your image to a certain format and size, you will need to plan ahead. The table below shows six common print and paper sizes for American printers. The most common paper sizes are 4 by 6 inches and 8.5 by 11 inches. Many photo printers will print borderless prints in these sizes.
The first step in planning your print is to know what size print you want. Your image must have the same Height/Width ratio as the print size you desire. The table also shows the Height/Width ratios of the most common image sizes in both horizontal and vertical formats. Click Lock selection H/W ratio... on the Edit menu (last option) and enter the ratio you need in the dialog box. The default setting is zero, which unlocks the ratio to allow for free selection.

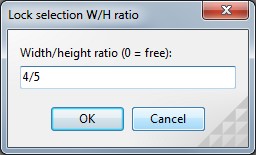
Now your selections will be locked into the ratio you select. Make your selection with the Rectangle Selection Tool and then crop the image by pressing Alt+C or by going to Operations/Size & orientation/Crop on the menu bar.
|
Paper Sizes and Height/Width Settings
|
| Paper and Image Sizes |
Width/Height Settings |
| Inches
| Centimeters
| Horizontal
| Vertical
|
| 4 x 5
| 10.2 x 12.7
| 5/4
| 4/5
|
| 8 x 10
| 20.4 x 25.4
| 10/8
| 8/10
|
| 3.5 x 5
| 8.9 x 12.7
| 5/3.5
| 3.5/5
|
| 5 x 7
| 12.7 x 17.8
| 7/5
| 5/7
|
| 4 x 6
| 10.2 x 15.2
| 6/4
| 4/6
|
| 8.5 x 11
| 21.6 x 27.9
| 11/8.5
| 8.5/11
|
When you are ready to print your image, press Ctrl(P) or go to File/Print on the menu bar. The print screen will give you several options to set.

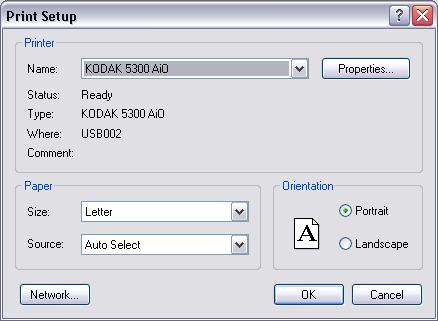
The icon at the upper left of the screen will send your image file to your printer, but first you must select the orientation and the size of the print you want. The second icon from the left calls up the Printer Setup dialog. Here you select which printer you want to useif more than one printer is connected to your computer. You also select the size of the paper in the tray and the orientation of your imageeither Portrait (vertical) or Landscape (horizontal). Click on OK when you are ready. Click the third icon, the red X, if you want to exit the dialog without printing. You don't need the setup menu if your image is vertical (portrait format). An alternate way to print horizontally (landscape format) is to press Ctrl(O) to rotate a vertical image 90 degrees on the screen.
Lastly, before you print you image, you must set the size. Click on the up or down arrows to change the print size. The printed area in relation to the paper will be shown in blue against a white background and will be indicated in centimeters. Refer to the table above for equivalents in inches for the sizes that are tabulated. You can also click the Fit button to get the maximum size print for your paper.
You also have the option of moving the position of your printed image on the paper. Hold down the left mouse key to drag the image to any position, or right click the mouse to align the image to the left, right, top, or bottom of the paper. Doing this allows you to print on one part of the paper and then run it through a second time on another part of the paper.
Now click on the Print icon at the far upper left corner of the screen, and your image file will be sent to the printer.
meesoft.logicnet.dk
Last updated 2013-09-19
by Jim Clatfelter